Pokémon Dream Radar With RNG Reporter: An RNG Guide
Pokémon Dream Radar for the Nintendo 3DS is the main method of capturing the Therian Formes of Tornadus, Thundurus and Landorus: at some point or another, most RNGers with at least moderate skill have sought to RNG these Pokémon and others from Dream Radar, only to find that RNG Reporter has no option for it, and learn that they can only RNG them if they have PPRNG, the Mac equivalent of RNG Reporter. However, most of them do not realize that it IS entirely possible to RNG Dream Radar Pokémon using RNG Reporter’s Researcher. That is where this guide comes in to help!
Prerequisites and Preparation
Before starting, make sure you are familiar with the basic terms of RNGing and have followed the directions to calibrate your Pokémon Black 2 or White 2 cartridge. You will need the following to perform this RNG:
- RNG Reporter
- Pokémon Black 2 or White 2
- A Nintendo 3DS and a copy of Pokémon Dream Radar
- Your DS’s parameters; see the Calibration Guide for how to find this.
Additionally, while one would initially think you can only RNG Dream Radar Pokémon using a 3DS, you can use any DS to RNG them after they have been sent to the game from the Dream Radar app, and hence a DS Lite is recommended.
Before going any farther with this guide, it is suggested you catch one or two regular Pokémon (without capturing Tornadus-Therian) inside the Dream Radar app in order to practice RNGing them. This is imperative, as this form of RNGing has zero margin for error, meaning that you should be comfortable with it before trying to get a Legendary or Therian Pokémon, as those can only be transferred to a game once per Dream Radar save and once per Black 2/White 2 game save. Also, you must transfer any non-legendary Pokémon to your game card before capturing and RNGing a Legendary or Therian, since a method for RNGing Legendaries while sending another Pokémon has not been researched yet, and doing so will cause your RNG attempt to fail. On the plus side, all Therians and Legendaries are captured within their own Radar Extensions, so it is incredibly easy to avoid sending other Pokémon with them.
Backing up the SD card before RNGing important Pokémon
One of the most limiting quirks with Dream Radar RNGing is that you can only transfer each Legendary Pokémon or Therian once per Dream Radar save file, and each game card of Black 2 or White 2 can only receive a Dream Radar Legendary or Therian once without restarting the game. Due to this inconvenience, anyone would like to have at least a small safety blanket, right? That comes in the form of backing up your save file before transferring the Pokémon. This has two perks: first, if you fail to RNG a Pokemon correctly, you won’t have to play Dream Radar all over again and get 3000 Dream Orbs for that Landorus-Therian, and second, you can transfer the same Pokémon to multiple game cartridges (as long as you are willing to RNG it again). The process is simple: put your 3DS’ SD card into a computer, and make a copy of the folder titled “Nintendo 3DS”. This will back up all your downloaded games’ save files, so it is equally important to backup your current folder contents before overwriting it with an older backup that contains a Therian or Legendary.
Familiarizing yourself with the seed verification method
One of the more unique aspects of RNGing Dream Radar Pokémon is that you can actually verify your seed before receiving your RNGed Pokémon. Additionally, you must use this same tool to advance the frames and hit the one you are aiming for. This tool is the spinning icon used while waiting for wireless communication on the IR Key Transfer screen that tells you to keep waiting, which will hereafter be referred to as the “spinner.” The way it works is you need to watch the direction it is pointing immediately when it appears, and it requires attention as it moves pretty fast. Unfortunately, RNG Reporter does not simply use arrows to tell you which direction it should point if you have hit your seed like PPRNG does. Fear not, as the method outlined below using the Researcher function of RNG Reporter gives you numbers that correspond to each of the eight directions. They are as follows:
0 = up, 1 = up-right, 2 = right, 3 = down-right, 4 = down, 5 = down-left, 6 = left, and 7 = up-left

How it works
By now you are probably wondering just how Dream Radar RNGing works and why it is different from the other 5th Generation RNG methods. The following sections will break it down for easy comprehension.
Advancing the IV and PID Frames
Perhaps one of the largest influences on the RNG is that the IV Frames and the PID Frames are both advanced simultaneously by two frames each. Hence, while searching for seeds, you will be forced to only accept results with either even- or odd-numbered target frames, depending on your starting IV frame, which varies depending on the Pokémon being RNGed. Furthermore, as both frames are advanced at once, you will have no control over what PID frame you hit. The logical extension of this is that you will have to search through multiple seeds until you find one on which the Nature you are looking for ends up on the frame “attached” to the seed.
Transfer Slots
Another unique aspect of RNGing Dream Radar Pokémon is that there are “slots” in which the Pokémon are sent, since Dream Radar allows up to six Pokémon to be transferred at once. Additionally, the frames for both IVs and PIDs are advanced for each Pokémon transferred. If this weren’t the case, you would be able to get six Adamant penta-flawless Pokémon at once! Additionally, the amount by which the frames are advanced varies slightly depending on if the Pokemon in the preceding slots are genderless or not, such as Porygon and Beldum. However, all the Therians and Legendaries in Dream Radar do not occupy normal transfer slots, and instead have their own separate slots. The mechanics for these slots, however, are in most ways identical to regular slot 1 and slot 2 transfers, and shall be covered more in-depth later.
The Memory Link PID offset
An important note must be made concerning the use of the Memory Link option in the Unova Link menu. Not only does it affect your starting PID frame for every RNG, but it also causes an additional -1 offset when RNGing Dream Radar Pokémon! If you have used Memory Link, take this into account while searching for a seed with the desired Nature and when verifying if you hit your timer0 (more info on both later on). However, there is a rather curious bug in the game programming that causes some people’s game cards to be treated as if they have used Memory Link, whether or not they really have! Fret not, as this offset is tied to the game cartridge rather than the seed, so as long as you determine if your cart is affected by this, you can account for it in all future RNG attempts. This is the main reason that it is important to practice this RNG at least once per cartridge before attempting to RNG a Therian or 4th Generation Legend!
So! On to the main event!
Finding Seeds
Under most circumstances, finding a seed is the most time-consuming part of trying to RNG Pokémon from Dream Radar while using RNG Reporter. This stems from the fact that RNG Reporter has no built-in tool for finding Dream Radar seeds, and hence you need to search through the seeds manually. Thankfully, it sounds worse than it is, and once you are familiar with the process, it can actually be done fairly quickly (as long as you aren’t too unlucky).
Using the Time Finder and selecting seeds
The first step is to start up RNG Reporter and open the 5th Generation Time Finder window. For the sake of brevity, only slots one and two, which are the only ones used for RNGing Therians and Legendaries, will be discussed in the main body of this guide. First, set the year you would like to RNG in, and select all twelve months. Due to the rarity of seeds with a useful Nature attached to them, you want to give yourself a wide variety of seeds. Next, set the min and max frames. Since it is possible to verify that you have correctly hit your seed with this RNG while you are advancing the frame, it is recommended that you set the minimum frame to at least 8 frames above the starting frame, so that you will have four advancements with which to verify your seed. It is incredibly rare to have two seeds with the same sequence of the first four spinners. As far as the max frame goes, set it to at least 50 frames above the minimum, in order to have a good spread of seeds (but don’t go too high; otherwise you will be sitting for 20 minutes advancing the frame for no good reason). After you have set the min and max frames, enter your desired IV spread, allowing yourself the widest variety of IV spreads as you are willing to accept. Of course, if you are aiming for something like HP Flying Thundurus, you would still like a decent base power for Hidden Power… which is why RNG Reporter has a helpful pair of options, HP_E and HP_O, which only search for IVs that would create a Base 70 power for Hidden Power. If you are using these options, it is recommended to add another 50 or so frames to the max frame. Leave everything else blank, and your screen should look something like the one below:
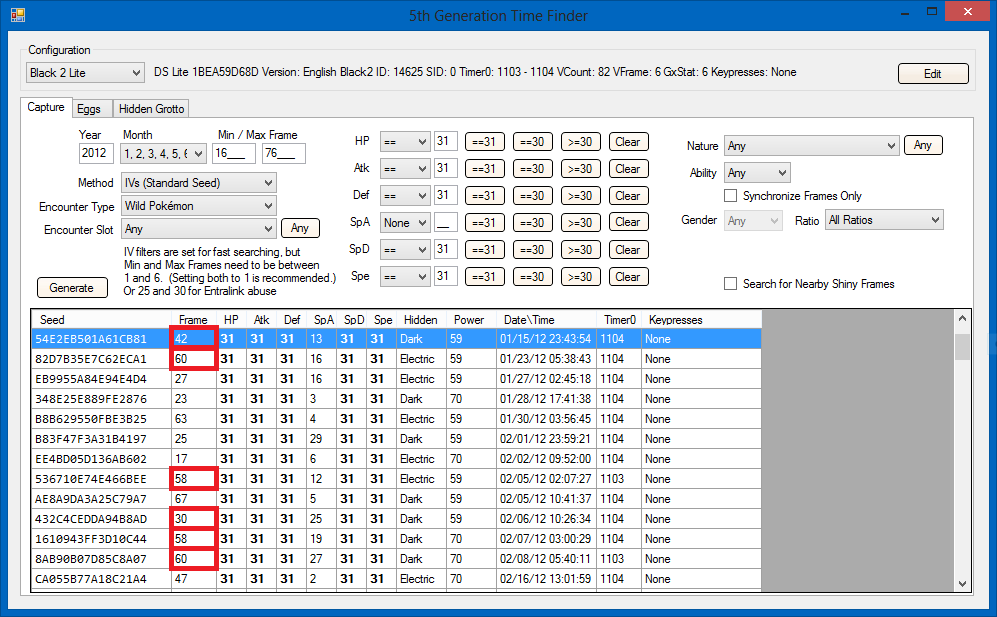
Now here’s where Transfer Slots come into play. The starting frame for IVs when RNGing Dream Radar Pokémon is 8. Because the starting frame for IVs advances 13 after each Pokémon transferred, and because frames can only be advanced two at a time, slots 1, 3 and 5 can only use even seeds (such as the ones above ), and slots 2, 4 and 6 can only use odd seeds. A useful trick that can be used while doing this is to add eight to the starting frame to automatically give you 4 advancements for verification purposes. If this is done, you can always set your minimum frame for slot 1 Pokemon to 16, and 29 for slot 2 Pokemon. After slot 2, just add another 13 to the number for each slot. For the purposes of this guide, I will use the first seed listed in the window above (highlighted in blue) to illustrate this process.
Finding the Nature hit
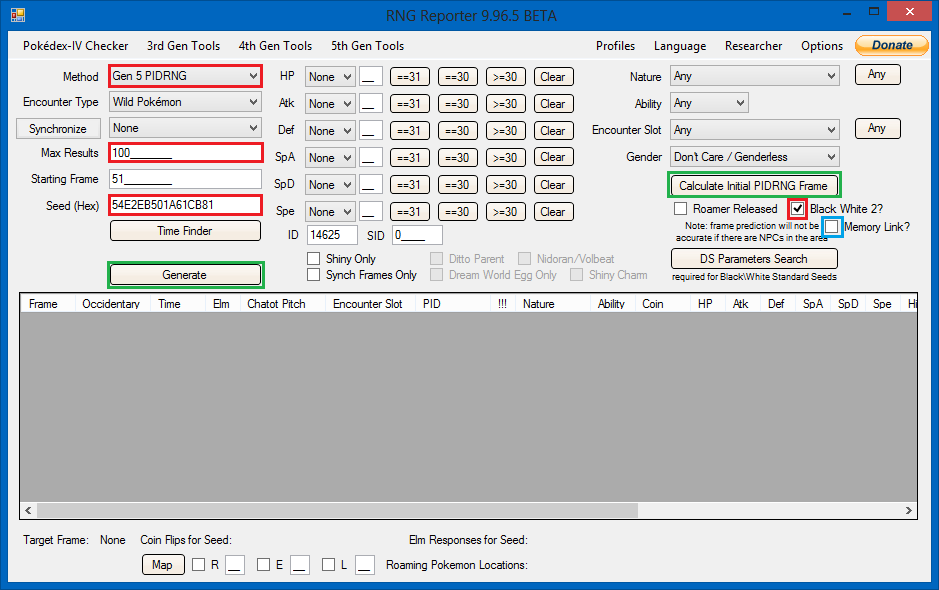
So now that you have a list of possible seeds, it’s time to search through them until you find a good Nature! Go back to the main window of RNG Reporter, change the method to “Gen 5 PIDRNG”, set Max Results to somewhere between 100 and 300, copy a suitable seed from the Time Finder into the appropriate box, and check the box labeled “Black White 2?”. If you have used Memory Link on the game you are RNGing with, check the Memory Link box as well, and then click “Calculate Initial PIDRNG Frame”. Now that you have your starting frame for PIDs, click Generate to create a list of Natures. Be aware that Dream Radar Pokémon cannot be Shiny, so there is no sense in searching for a Shiny frame. As of this time, it has not been determined how Dream Radar generates a Pokémon’s gender, but it usually will be female, so you can ignore everything but the Natures. Besides, considering that you can breed any female Dream Radar Pokémon for a different gender later on, this is purely trivial. Your main window should look something like this before clicking Generate:
So that’s all fine and good, but what frame will I actually hit? The frame you hit is determined by the following equation:
Nature Frame = Initial PID frame + offset + (IV target Frame – [8 + {13 * slots before current slot}]) + (5 * number of slots before current slot)
This equation looks a bit daunting at first, but it can be greatly simplified as long as you are only RNGing in slots 1 or 2. Here are the simplified forms:
Slot 1: Nature Frame = Initial PID Frame + offset + IV target Frame – 8
Slot 2: Nature Frame = Initial PID Frame + offset + IV target Frame – 16
In these equations, “offset” is equal to 1 for genderless Pokémon, and 2 for Pokémon that have a gender. Since most of the Pokémon from Dream Radar have genders, usually you can treat offset as 2. Furthermore, game cards that have used Memory Link or act as if you have will possess an additional offset of -1. Whether or not your game is treated as if it has used Memory Link can be determined the first time you RNG a Pokémon from Dream Radar. (More on that below.)
Using the seed I chose earlier, my target frame is 42 and my initial PID Frame is 51, so if I plug those numbers into the Slot 1 equation, I get:
Nature Frame = 51 + 2 + 42 -8 = 87
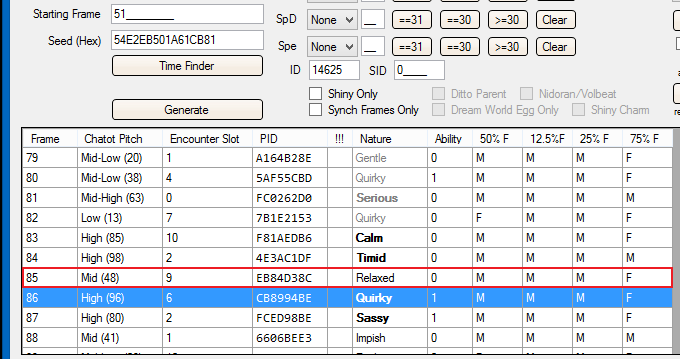
Hence, the Nature my Pokémon would have is Sassy. However, since my card acts as if I have used Memory Link, the Nature Frame will be 86 instead, making it Quirky, as shown in blue below. On a side note, if I was transferring a genderless Pokémon such as Porygon or Beldum, the offset would be one instead of two, making the Nature Relaxed. (shown in red)
Mechanics for Therians and Legendaries
As stated earlier, Therians and Legendaries have their own transfer slots. But how do these work? The simple answer is that they work almost no different from regular slot 1 and slot 2 RNGs… almost. Therians are RNGed as if they are gendered Pokémon that are in slot 2 with a gendered Pokémon in slot 1 (although there really isn’t one there). Therefore, you can use the short form of the slot 2 equation given above without any problem. The “4th Generation Mascot” Legendaries are even simpler than Therians. They behave exactly like slot 1 gendered Pokémon, making the matter almost trivial. However, it must always be remembered that unless you back up your Dream Radar save file and have multiple Black 2 or White 2 game cards (or are willing to restart them), you only have one chance to RNG each of these. Hence, you should never under any circumstances transfer any other Pokémon with these Therians and Legendaries, since it has not been researched how other Pokémon affect the special transfer slots, nor has it been attempted to transfer multiple special Pokémon at once.
RNGing the Pokémon
Now that you’ve found a good seed to RNG with, it’s time to actually get that Pokémon!
Sending it from Dream Radar
The first step is to place the cartridge you would like to RNG with into your 3DS, and enter the Dream Radar app. If you are transferring a Therian or a Legendary, here is the point to back up the SD card! On the main menu, select “Send Research Data”, and make sure that the Pokémon you wish to RNG is in the slot that corresponds to the seed you found. If it isn’t, you need to find a new seed, taking into account what slot it is in. Additionally, items do not affect the RNG process, so they can be ignored for all intents and purposes. If everything is correct, confirm that you are ready to send the Pokémon. After it is sent, you can turn off the 3DS and put the game cartridge into the DS you wish to RNG with.
Hitting and verifying your seed
Now, to get to the heart of the process of RNGing Dream Radar Pokémon: hitting and verifying your seed! Since verifying your seed takes place at the same time as advancing frames, this guide will go straight to verification. In the main window of RNG Reporter, click “Researcher” on the right side of the toolbar at the top of the window. A fairly sterile window with a decent amount of buttons and text entry fields will appear. Next to “Common RNGs”, open the drop-down list and select BWRNG. Then to the right, next to “Custom 1”, set the first list to “32Bit High”, set the second to “>>”, and enter the number 29 into the text box. This information will allow RNG Reporter to list the directions the waiting icon will point to while verifying your seed and advancing the frames. Set Max Results to a number somewhere around three or four hundred. Paste the seed you are RNGing with into the corresponding box, and your window should look something like below:
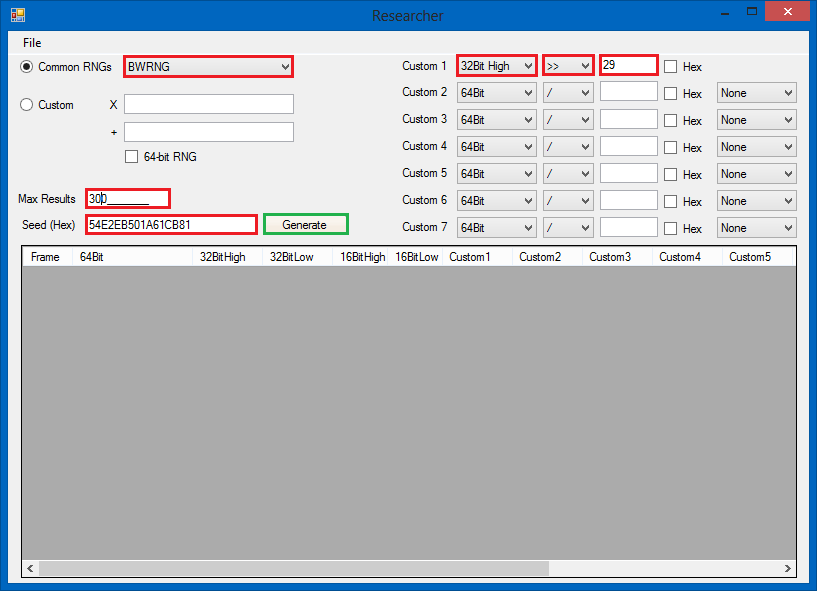
If everything is correct, click Generate, and a list of the seeds corresponding to the frames of the seed you are using will appear, in addition to a row of columns marked “Custom 1”, “Custom 2”, etc. Thanks to all those boxes you set values in, the “Custom 1” column will show a number between 0 and 7 next to each frame. That number tells you what direction the waiting spinner will be pointing when it starts on that frame, allowing you to test if you really hit your timer0! The process of verifying your seed is very easy, if not attention-demanding: after turning on the DS on-time as if you were hitting a Simple Seed, enter the “Unova Link” menu instead of loading your save file. From there, enter the “Key System” menu and select “Send and Receive Keys”. The game will ask if you would like to launch DS Wireless Communications, and if you say yes, the game will prompt you to have your DS system face another, and a waiting spinner will appear in the lower right. Of course, we are only interested in the spinner! Make sure you are watching the lower right corner when you say “Yes”, and take note of which direction the icon was pointing when it started spinning. It moves fast, so it requires all your attention. Press B to stop it, write down what direction it was pointing when it started, but do not leave the menu yet. Both the IV frame and the PID frame were just advanced by 2! When you try hitting your seed, you need to continually stop and restart the spinner to advance the frame as far as necessary. The question is, how many times do you have to do it? The number of times you need to advance the frame is derived from this equation:
Advancements = (IV target Frame – 8 + [13 * slots before current slot]) ÷ 2
So, the next step is to confirm if you really hit your seed. This is one of the places where your game card’s Memory Link frame offset comes into account, and is identified for the first time in the event of your game acting as if it has used Memory Link. In the researcher window, scroll to the frame before your starting PID frame (as given in the main window).
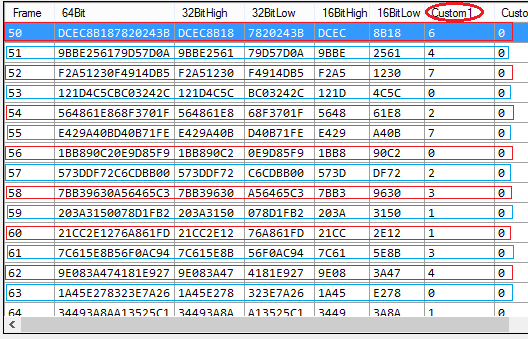
So, if you look at the image above, you will see a table of frames and seeds that is similar to what you should see at this point. After you go through the process of hitting your seed, try verifying it using the method stated above. If your game has not used Memory Link and does not act as if you have, the first spinner should correspond to the frame after your initial frame. For example, the seed in the image above has a starting frame of 51, so the first spin should land on 52, pointing to the upper left (7). Each of the following advancements will appear every other frame after the first, so the next 4 in the image would be 2-0-3-1, that is, right, up, bottom-right, top-right. However, if you have that Memory Link offset, the first advancement will occur directly on the starting frame, and all the following spins will be in essence one frame before the regular. The frames with a light blue box around them in the above image illustrate this. Remember, if you find at this stage that you have a PID offset of -1, your Nature frame will also be one less than the one derived from the earlier equation.
If after advancing the frame four times it appears that you have not hit your seed (checking both the regular sequence of frames and the offset-influenced sequence), you need to try again, since you doubtlessly missed your timer0. Once you have determined that you hit your timer0, all that is left is to finish doing as many advancements as determined by the equation above. Now, to receive the Pokémon in-game and check if you succeeded!
Receiving your Pokémon – Success?
Leave the Key Transfer menu, but do not leave the Unova Link menu. Should you do so, the RNG will be reseeded and you will need to try hitting your seed again. Go to the 3DS Link menu, and say yes to receiving your Pokémon from Dream Radar. The game will save, and then you can leave Unova Link and enter the game. Go to any PC and open the storage system, find the newly-transferred Pokémon, and place it in your party. Take it to the Judge in the Battle Subway. If everything was done right, your Pokémon should have the IVs you found in the Time Finder! That is the part you can be more certain of success with. If for some reason your IVs are incorrect, you probably did the wrong number of advancements or missed your timer0. The latter can be avoided by always allowing for at least four advancements, after which you can be reasonably sure that you hit the right one.
Now for the more uncertain part: did you get the right Nature? Open the status screen of your RNGed Dream Radar Pokémon, and check the Nature. If you didn’t run into any indications of an offset, you should have the right Nature! If you don’t, go to the main window of RNG Reporter, and look at the frame right before the expected Nature. Chances are, it will match the Pokémon you just got, indicating that your game card behaves as if you used Memory Link. The good news is that (hopefully) it was only a practice Pokémon, and you can count on all further RNGs with that game card having the offset! (Which is easily worked around by taking it into account while checking the Nature paired with each seed.)
Conclusion
Well, it is a tough road to RNGing your first Pokémon from Dream Radar, but now you can take pride in having successfully learned one of the most complicated RNG processes out there. After the first one, all future Dream Radar RNGs will hardly be difficult at all, and with patience you can have access to all sorts of Dream Radar exclusive Dream World Pokémon! Good luck, and happy RNGing!
About the Author
HeroOfTheWinds Chris N., better known as HeroOfTheWinds, is a Masters Division player living in Hawaii who only picked up on VGC in the August of Worlds '12, but has been playing the series since 8 years old. He might not be a big-ticket player now, but he is continually striving to better himself, as evidenced by his placing 26th in North America (269th overall) during the June International Challenge. He enjoys playing games and RPGs on Nintendo.
Related Posts

Breeding Perfect Pokémon in Omega Ruby and Alpha Sapphire →

Efficiently Capturing Your Roamer in Pokémon X and Y →

Mastering Kalos: Tips for the In-Game Trainer →

Pseudo RNG Abuse for Eggs in Pokémon X & Y →
2 Responses to Pokémon Dream Radar With RNG Reporter: An RNG Guide
Leave a Reply
You must be logged in to post a comment.


This guide will actually be helpful, because I have the Johto Legendaries I would like to RNG still. Thanks a lot, and props for making the guide easy to follow.
Of the guides out there for Dream Radar RNG, this is probably the best–most guides don’t seem to touch on the Memory Link stuff as much. It’s a little hard to reference the information while actually doing the process, but I’ll take what I can get.
However, there is a critical error! This is your formula for calculating advances required:
Advancements = (IV target Frame – 8 + [13 * slots before current slot]) ÷ 2
It should be:
Advancements = (IV target Frame – 8 – [13 * slots before current slot]) ÷ 2
This change makes it in-line with other guides, like this one. I saw two different formulas here and elsewhere, and following your formula really, really threw me off in my practice for the Therians. For Slot 1 Pokemon, this formula works just fine, obviously–13 * 0 = 0, so it’s a non-factor. But by adding 13 instead of subtracting 13 for Slot 2+ Pokemon, a serious problem is created. I actually had some success with a Slot 2 RNG using this formula (somehow), so I thought the problem was possibly down to me using keypresses, but that didn’t make too much sense with what I know about seeds and such. 🙂