
Pokémon Heart Gold and Soul Silver Roamers: An RNG Guide
RNGing for Raikou, Entei, Latios and Latias in HeartGold and SoulSilver is similar to RNGing for the roamers in DPPt. There are a few differences between RNGing in both sets of games that you need be aware of. However, if you’ve already RNG’d the roamers in DPPt, you will have relatively few problems RNGing them in HGSS and vice versa.
This guide will assume you have already found your calibrated delay and second, as explained here and are familiar with the basic terms of RNGing.
Requirements
- The most recent version of RNG Reporter
- The most recent version of Eontimer
- Master Ball
- A Pokémon with Fly in your party
- A team strong enough to sweep through the Elite Four post-game
- A level 35 Pokémon to lead the party with repels (do this after defeating the Elite Four)
- Make sure all three roamers are released, but only 1 at most captured (more on that later)
- A DS Original/DS Lite along with a 3rd generation game cartridge (RSE, FRLG) is preferred, but not required (more on this later)
Why All Three Roamers Must Be Released But Only 1, At Most, Captured
To begin with, you will be RNGing for these roamers at the tile right before the auto-walk sequence that precedes the battle against Champion Lance. HGSS does not have a Journal to advance the frames or a Coin Flip app to verify that you hit your seed as in DPPt. Instead, you will be advancing the frames with the radio and verifying you hit your seed with the roamer method.
The roamer method involves checking the locations of roaming Pokémon on the map in the Pokégear to verify you hit your seed. For example, let’s say you are trying to hit a seed that corresponds to Entei roaming on Route 32 and Raikou roaming on Route 33. After soft-resetting, if you open the map on the Pokégear and see Entei and Raikou on Routes 32 and 33, respectively, then you’ve hit your seed and are free to advance the frames with the radio until you hit your desired target frame.
In most other 4th gen RNGing, you can verify you hit your seed by calling Professor Elm (more on that later). However, it’s impossible to call Elm to advance the frame and verify your seed in the Champion’s room. This is why we are forced to rely on the roamer method.
You can only ever feasibly RNG for one roamer at a time. To do this, release all the roamers if you have not already done so. Only KO the roamer you want to RNG. For example, let’s say we want to RNG a 31/X/31/31/31/31 Timid Latios in SoulSilver. We would first release Raikou, Entei and Latios to roam Johto and Kanto, respectively. Then, we would KO Latios. Re-defeating the Elite Four will revive the Latios and, assuming you RNG’d correctly, it will have the desired nature and IV spread.
As long as you have at least one roamer free in the wild, you can reliably verify your seed via the roamer method. However, if you have captured two of the roamers and want to RNG the third, you will have no way to verify which seed you hit since you will not have Elm calls or the roamer method available at that point (don’t forget, the remaining roamer would have to be KO’d in order to RNG it). You would be better off replaying your save file to regain the three roamers.
But Why Not RNG Them When They’re First Released?
Good question. After all, that’s what we do in DPPt, right? However, it’s a different story in HGSS. For Latios and Latias, it’s primarily because of a wandering NPC that advances the frame in an unpredictable manner. For Raikou and Entei, it’s the lack of a reliable way to verify you hit your seed in the Burned Tower at the beginning of the game. For most of HGSS RNGing, calling Professor Elm after
- Showing him the hatched Togepi egg
- Showing the Pokémon Center nurse a Pokémon infected with Pokérus
- Entering Kanto post-Elite Four
is the way to both verify your seed and advance the frames. You can still advance the frames with the radio, but you still won’t be able to verify your seed without the roamer method or Elm calls since you will not have beaten the Elite Four or entered Kanto at the beginning of the game.
For all the HGSS roamers, it is still technically possible RNG them when they’re first released, but you would spend much more time than necessary doing so. The most feasible way to RNG these Pokémon is to do so the tile right before the auto-walk sequence that precedes the battle with Champion Lance the second time onward when challenging the Elite Four. This is what this section of the guide will focus on.
Starting Frames
It is highly recommended to RNG and revive only one roamer at a time. In fact, this guide will assume that you will RNG and revive only one roamer at a time, as RNGing one roamer and reviving another roamer simultaneously will shift your starting frame for each roamer. Not only that, but reviving the roamer you don’t want to RNG beforehand will make it easier to RNG the roamer you actually do want to RNG since you’ll be able to use the roamer method.
Also, RNGing two roamers at once is all but impossible, similar to the legendary birds when RNGing in Platinum, since finding a suitable pair of frames for both roamers is either impossible or impractical. If you have already KO’d any roamers, revive them by re-defeating the Elite Four first.
- For each roamer currently running in the wild, the frame is advanced by 1 — usually
- Sometimes, it advances by 2
- Starting Frame = 1 + Number of Current Roamers
- i.e. if I am RNGing for a Timid Latios with both Entei and Raikou roaming, my starting frame will be 3
- The Seed to Time window in RNG Reporter will tell you the number of frames advanced when you check each roamer box, which is equivalent to the Number of Current Roamers value in the formula above (more on this later)
- Every roamer is generated via Method 1 in RNG Reporter
Difference between RNGing Legendary Birds in Platinum and RNGing Roamers in HGSS
In-Game Preparations
- Revive any KO’d roamers that are not your desired roamer by re-defeating the Elite Four
- KO your desired roamer
- Open up the Pokégear and go to the radio
- Make sure the cursor is in the middle where it won’t play any music
- Save at the tile right before the auto-walk sequence that precedes the battle with Lance
Finding Your Desired Seed
- Open up RNG Reporter
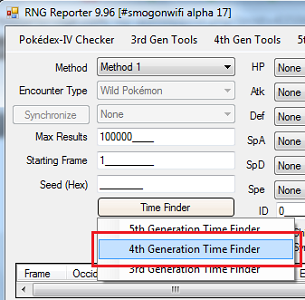
- Under Time Finder, click 4th Generation Time Finder. A new window should pop up
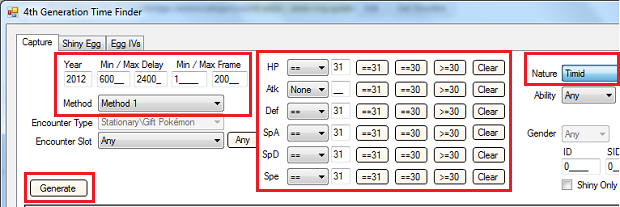
- Go to the Capture tab if not already there
- Input your IV search parameters in the IV field
- Input the Nature and Ability you want in their respective fields
- Input Method 1 in the Method field
- Set your Min/Max Delays. These are up to you, but I personally go for 600–2400
- Set your Min/Max Frames. Again, these are up to you, depending on how many advances you want to do, but I personally go for 1–100
- Above is an example of finding a seed for a flawless Timid Latios, on frame 14
- In this example, we will have Raikou and Entei roaming
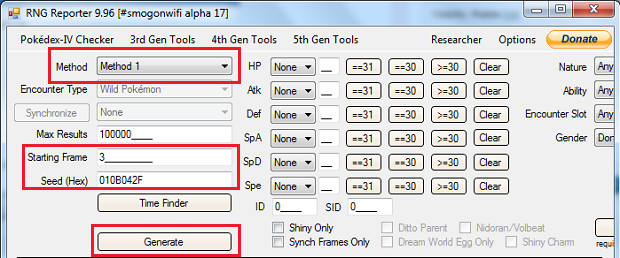
- Now go back to the RNG Reporter Main Window
- Make sure Method 1 is selected in the Method field
- Remember, Starting Frame = 1 + Number of Current Roamers
- Since we have both Raikou and Entei roaming, our Starting Frame = 1 + 2 = 3
- Input the calculated Starting Frame into the Starting Frame field
- Copy and paste your seed from the 4th Generation Time Finder window into the Seed (hex) field
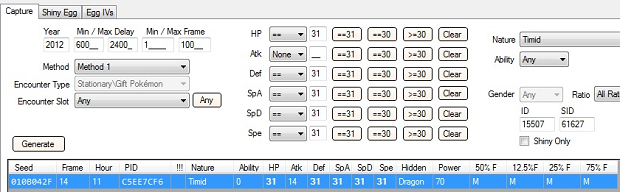
- Hit Generate
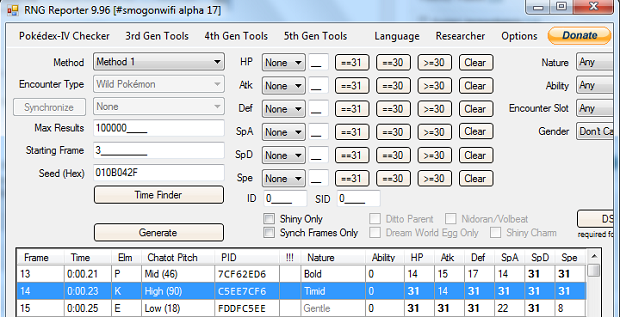
- Scroll down and select your desired frame (in the Latios example above, this would be frame 14)
- Now, we have to advance the frames from the Starting frame (3 for Latios in this example) to the Target frame (14 in the Latios example)
- Verify that the PID in the Main Window and the Time Finder are identical — if they’re not, ask for help in our forums!
Seed to Time
- So now that we’ve found a desired seed and verified that the PIDs match in the Main Window, now we’ll have to find a time for us to actually RNG the Pokémon
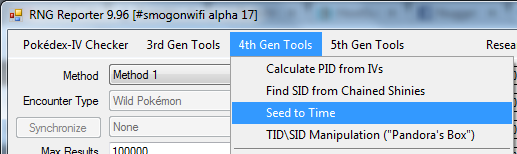
- On the RNG Reporter Main Window, click on the 4th Gen Tools button
- Select Seed to Time and a new window should pop up
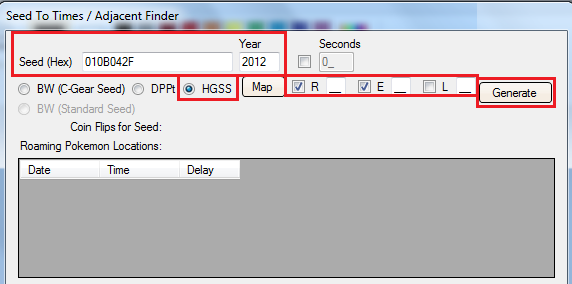
- Copy and paste your seed into the Seed (Hex) field
- Select HGSS and choose the year you want to search in
- Check the boxes for the roamers you currently have in the wild: R for Raikou, E for Entei, and L for Latios
- In the Latios example, both the R and E boxes are checked
- Hit Generate (the first button near the top right, not the bottom one–that’ll be later)

- Notice next to the Roaming Pokémon Locations field that corresponds to your seed, it lists what routes your roamers should be on
- Also notice next to the listed routes, there’s a Frame(s) Advanced field
- As stated earlier, your starting frame = 1 + the number in the Frame(s) Advanced field
- The number in your Frame(s) Advanced field should match the number of current roamers and the number of roamer boxes you checked
- A list of dates, times and delays should come up
- Pay attention to the delay that shows up–it should be the same regardless of what time you go for.

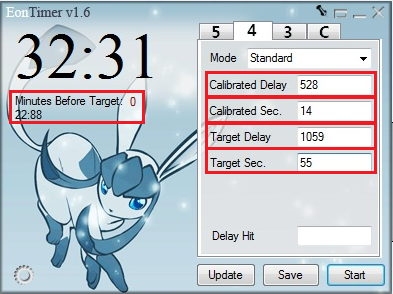
- Open up EonTimer
- Input your Calibrated Delay, Calibrated Second and Target Delay (1059 in my Latios example)
- Now we want to adjust the timer so that we’re not waiting unnecessarily long to hit our seed
- Now, input a value in the Target Sec. (from 0 to 59) that will make the first timer (above Minutes Before Target: 1) last for approximately 32 seconds or so
- The second timer (below Minutes Before Target: 0) is determined by your delay
- If your second timer is too short (under 20 seconds or so), then find another seed that gives you a longer 2nd timer

- Once you find your Target Sec. (55 in this example), go back to the Seed to Time window
- Check the box for the Seconds field and input your Target Sec.
- Hit the same Generate button again
- A list of times that will work best with your timer will show up

- Select a time
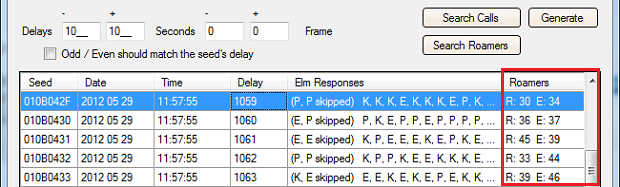
- Input 10 in both the – and + Delay fields. Input 0 in both the – and + Seconds fields. Leave the Odd/Even should match the seed’s delay box unchecked for now
- Hit the second Generate button (right next to Search Calls)
- You should now have a list of about 20 delays, their corresponding seeds, Elm Responses (ignore this column, since you can’t call Elm to advance the frame or verify your seed in the Champion’s room) and Roamers column, which lists which roamer will be at which route corresponding to a seed/delay
- The date and time should all be the same
- Find your desired delay in the list (1059 for the Timid Latios example) and select it
- This is the list of frames that you will be searching within to verify your seed
Even and Odd Delays
- Remember when I told you to leave the Odd/Even should match the seed’s delay box unchecked?
- Do you see in the newest list we generated that there are both odd and even numbered delays?
- When you load the game, the Pokémon you are trying to RNG will only have spreads on either odd or even numbered delays
- For example, as you soft reset for the Timid Latios, you might find that you are landing in frames 1055, ,1057, 1061, or 1063 repeatedly — this shows that the game is operating on odd delays
- You will never hit an even delay if your game is acting on odd delays and vice versa
- We won’t know which set of delays, odd or even, the game is operating on until we verify our seed with the roamer method
- At the beginning of this guide, I stated that a DS Original/Lite with access to a 3rd gen game (RSE, FRLG) is preferable, but not required
- This is because the 3rd gen game cartridge would allow you to use the slot at the bottom of your DS to switch between odd and even delays if you find that you are trying to hit an odd numbered delay and the game is operating on even delays
- All you would have to do then is put the 3rd gen game into the slot and continue RNGing
- If you don’t have either of these older DS models and a 3rd generation game cartridge, you will not be able to switch between odd and even delays if the seed you want is on the other set of delays
- If this happens, you will have to find a whole new seed with a delay that matches what the game is running on
- i.e. if your game is only hitting odd numbered delays, then find a new seed with an odd delay
Finding Which Set of Delays You’re On, Odd or Even
- Now, we’re going to find out if your game is acting on odd or even delays
- Go to your DS time settings menu. Change the date to the one in your seed
- Now go to the time changing section. Use the arrows to prepare to change the time to the one found in RNG Reporter, but DO NOT ACTUALLY PRESS A YET to implement the time change
- Remember, RNG Reporter and the DS run on military time
- Now go back to EonTimer
- Do you see the Minutes Before Target field?
- If it says 1, use the arrows to prepare to change your DS time to one minute before the time that matches the seed you found in the Seed to Time window (DO NOT PRESS A YET)
- If it says 0, make sure the time matches the seed you found in the Seed to Time Window
- In this Latios example, the time in the Seed to Time window for my selected seed is 11:57:55
- This time is the exact moment the game is loaded after being soft reset
- If the two timers combined last less than a minute, this will be indicated in EonTimer, as mentioned earlier
- So on my DS, I would use the arrows to prepare to change the time to 11:57 because my Minutes Before Target field on EonTimer had a 0 instead of a 1
- Now, position one hand over the A button the DS to implement the time change
- Position your other hand to right click on the Start button on EonTimer
- Press both the A button on the DS and right click on the Start button on EonTimer at the same time
- Quickly turn off your DS
- Power on your game and load your save file
- When the first timer reaches zero, soft reset the game by pressing L, R, Start and Select
- Once the first timer reaches zero, the second timer will start automatically
- Get through the Press Start screen but do NOT load your save file yet. Stay on the “Continue” screen
- When the second timer reaches zero, press A to load your save file
- Pause the game and look at the Seed to Time window
- You should have already selected your desired seed in the list you generated at the bottom of the Seed to Time window
- Now look at the Roamers column
- Next to your current roamers letters (R & E in this example) will be some numbers
- These numbers correspond to the route these roamers are on when you pull up the map in the Pokégear
- In my example delay of 1059, the Roamers column says R: 30 E: 34
- This means that if I check my Pokégear map and Raikou is on Rt. 30 and Entei is on Rt. 34, I’ve hit my seed!
- This is how you verify the seed you hit–the Roamer method
- Remember how we generated a list of with 10 delays above and below your desired delay? This is where it’ll come in handy
- The Roamer method will allow you to pinpoint which seed you hit
- You can update EonTimer by inputting the delays you hit into the Delay Hit field of EonTimer and hitting Update as you continuously repeat this soft reset process until you hit your frame
- It will also let you know whether you are hitting odd or even delays
- Back to my Timid Latios example, if I hit a seed with a 1057 delay (instead of 1059 like I was after), then I narrowly missed my seed, but since 1057 is an odd number just like 1059, it means that I am on the correct set of delays
- If I had hit 1058 instead, then I would have simply plugged in a 3rd gen cartridge to switch over to even delays
- Or, if I didn’t have access to a 3rd gen cartridge and/or was RNGing on a DSi or a later model, I would have had to go back and find a different seed that had an odd numbered delay (since 2079 is an odd delay as well)
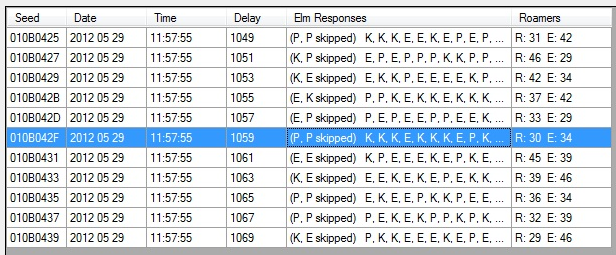
- Now that you are hitting delays that are in the same set as the target delay (odd or even), go ahead and check the box named Odd/Even should match the seed’s delay and hit Generate
- These will be the seeds you will actually be hitting
- For the purposes of this guide, I will assume that the delays I would hit if I was actually RNGing this Latios are odd. This is what my new list in Seed to Time would look like:
- If you hit the seed you wanted on your first try, proceed to the next section
- If you didn’t, turn off the game.
- Repeat the process of:
- Changing the time according to the Seed to Time window & EonTimer — remember, if EonTimer says Minutes Before Target: 1, you should change the time to one minute before the target time!
- Soft resetting after loading the game when the first timer reaches zero
- Loading the game again from the Continue screen when the 2nd timer reaches zero
- Using the roamer method to verify what seed you hit until you hit your desired seed
- This may take a little time. 4th gen RNGing is typically not as fast or easy as in 5th gen
- When you finally hit your desired seed, you’re ready to advance the frames
Advancing the Frames
- Pull up the radio
- With the stylus, move the cursor to the bottom right momentarily to activate either the Pokémon Search Party or Serial Radio Drama shows in the bottom right corner of the circle
- These are the only shows that reliably advance the frame by 1 each time the cursor goes on them
- Quickly move the cursor back to the center of the circle without hitting any other stations
- You have just advanced the frame by 1
- Number of Required Advances = Target Frame – Starting Frame
- In our Latios example, our Number of Required Advances is: 14 – 3 = 11
- So we will have to move the cursor from the middle to the bottom right section of the circle momentarily and back to the middle 11 times total to reach our target frame of 14
- Once you’ve advanced the necessary number of frames, walk forward to battle Lance
- After loading the game again, catch the roamer and verify that it has the desired IVs and nature with a stat calculator — I recommend Serebii’s IV Calculator
- If it has the desired IVs and nature, then congratulations! You’ve just RNG’d a roaming legendary Pokémon in HGSS!
- If you didn’t get the desired IVs and nature, find the the frame you actually hit in the RNG Reporter Main Window
- Calculate how many frames you were off the target frame and adjust the number of advancements accordingly
- It’s possible that one of the roamers advanced the frame by 2 instead of 1
- Or maybe you accidentally advanced the frames too much or too little, or hit another radio station
- Calculate how many frames you were off from the target
- KO your desired roamer again
- Save at the tile right before the auto-walk sequence that precedes the battle with Lance and repeat this procedure again with your new adjusted number of frame advancements
- At least this time, since you’ve already gotten RNG Reporter and EonTimer ready from your previous attempt, all you have to do is hit your seed again and advance the frame
Tips
Conclusion
I hope this guide, in addition to my previous guide, was helpful in explaining how to RNG the roamers in the 4th generation of Pokémon games –Diamond, Pearl, Platinum, HeartGold & SoulSilver. 4th gen RNGing isn’t as easy as in 5th gen or even 3rd gen, but there are plenty of wonderful RNG-worthy Pokémon found in these games. If you have any questions, feel free to ask in our forums!
About the Author
Adib started playing competitive Pokemon in the VGC 2012 season. He finished 2nd place at 2014 US Nationals, 10th place at 2013 US Nationals, 7th place at the Fall 2013 Ft. Wayne regionals, and 7th at APEX 2014.
Related Posts

Breeding Perfect Pokémon in Omega Ruby and Alpha Sapphire →

Efficiently Capturing Your Roamer in Pokémon X and Y →

Mastering Kalos: Tips for the In-Game Trainer →