4th and 5th Generation RNG Calibration
If you are reading this, you are probably wondering to yourself “What is calibration, and why do I need to do this?” Calibration is something you do initially before trying to RNG one of your Pokémon games and it is an important step in learning how to RNG because it gives you an idea of what your calibrated delay and second are. It is important to realize that some sort of calibration is needed in all generations to even be able to abuse the RNG. The calibration process is generally the same in all of the 4th Generation Pokémon games, while Pokémon Black and White have their own calibration method. This article will cover both. Before continuing, however, you should be familiar with some basic terms used when discussing the RNG process. If you are not already familiar with the RNG process, now would be a great time to brush up on your terminology using the RNG Dictionary.
4th Generation Calibration
Requirements
Before calibrating you will obviously need both a 4th Generation Pokémon cartridge and a Nintendo DS system (this guide’s example works with the DS Lite; some things may be different using another system. If you have questions about your particular set-up, visit our RNG Help Thread), but you will also need the following:
- Latest Version of RNG Reporter
- Eontimer
- Pokéballs
- Pokémon with Sweet Scent (if you are not using a stationary Legendary to calibrate)
- A general understanding of basic RNG terms (see the RNG Dictionary)
Basically, you calibrate your game by entering the game at a specific time, catching a Pokémon and then using its stats to determine what seed you’ve hit. This will give you your game’s delay and second, which you will be using every time you RNG in the 4th Generation games.
Before calibrating you need to decide whether you will be using a Wild Pokémon or a Legendary Pokémon (more specifically, a Stationary Legendary Pokémon like Dialga or Palkia) to find your calibrated delay and second. this guide will cover calibrating with Legendary Pokémon. Save in front of the legendary that you chose with your Master Ball (not required but saves a ton of time) before you continue on with the calibrating.
So How Do I Calibrate?
To calibrate, you will be capturing a random Legendary (or other Pokémon) after attempting to hit a random seed. I will be using the seed 02060352 to walk you through the calibration process, but any seed will suffice. First, you’ll need to understand how some of the software you will be using works. In the next section, I will explain how to use both Eontimer and RNG Reporter to get the information you need to be able to calibrate and then how to use these programs to calibrate your game.
Eontimer and RNG Reporter: How to Utilize Them
Without these two programs you would find that RNGing is nearly impossible. Both of these programs have very specific functions to take the “random” out of RNG. RNG Reporter tells you exactly what properties a specific seed has, while Eontimer helps you enter the game at the proper time. I will not be explaining the intricate details of how the RNG works, only how to utilize them to get results you want. For a basic introduction to what the RNG is and how it works, check out Toast’s Random Introduction article.
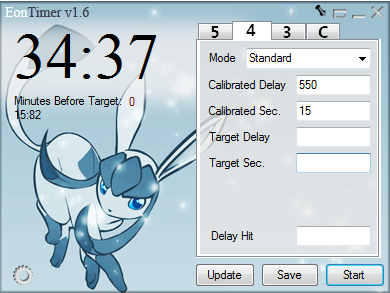
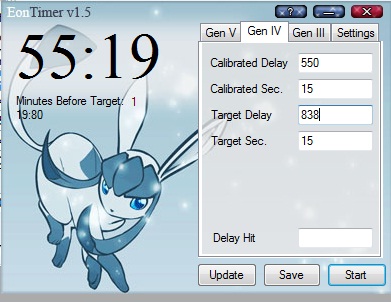
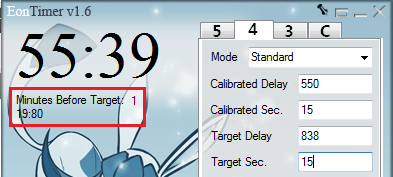
Open up Eontimer. Depending on which game you are using, the calibrated delay you should begin with will be different — for HGSS you will start with ~550 and for DPPt it will be ~650. Your calibrated delay will change after you actually calibrate, but these numbers are the easiest to use for each game initially. Eontimer is pretty self explanatory here: each box has a description above it saying what you put into it, so stick the delay number for your game in the “Calibrated Delay” box. For the “Calibrated Second” box put 15. Your Eontimer should now look like the picture above. Now that you have these two numbers in Eontimer, it’s time to open up RNG Reporter to find the “Target Delay” and “Target Second” and fill in those last two gaps.
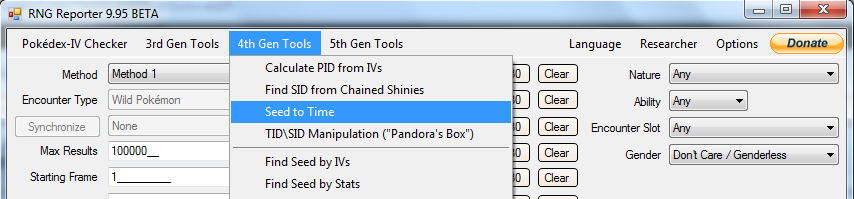
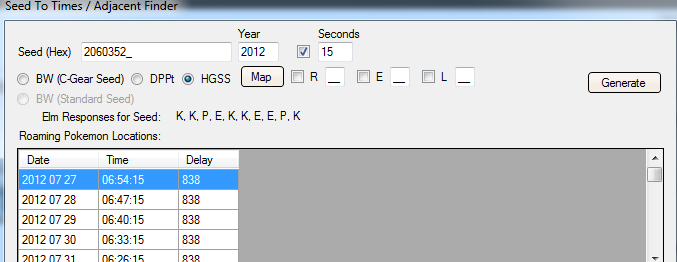
In the toolbar along the top of RNG Reporter there is a drop down box labeled “4th Gen Tools”. Hover over that and click the “Seed to Time” Option. In the “Seed (Hex)” box copy and paste 02060352, or whichever seed you have chosen to use, into it. Leave the year as 2012 and move on to the “Seconds” box. You should see a check mark next to this box — make sure it is ticked. While you can use any second you want, I will be using 15. Add this number to your Eontimer in the box titled “Target Second”.
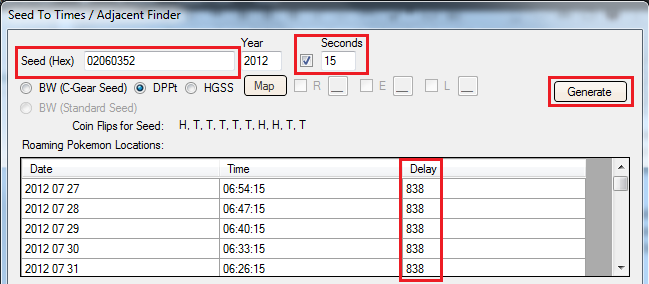
For calibration it does not matter if DPPt or HGSS is ticked since they both have the same time and delay, so you can click the first Generate button now. You should see three categories of information: Date, Time, and Delay. For our purposes, we only need to look at “Delay”. If you are following this guide and using the same seed, the “Delay” should be 838. This will be your target delay, so enter that into Eontimer in the box titled “Target Delay”. Now that you have filled all four of those boxes, Eontimer is ready to use. Congrats! If you are doing this for HGSS the Eontimer should look like the picture below, and you are ready to calibrate your DS.
Hitting a Delay
Finally after all that setup you get to play your game! Hitting a particular delay can get complicated, so we have broken it down into steps. Pay close attention and reread them if necessary. If you are still having troubles, you can always ask in the RNG Help Thread.
- The “Date” column in the “Seed to Time” box is what day you need to set your DS to. For this example we will be using the first data set that appears so set your DS internal date to July 27th, 2012.
- The “Time” column is the time you will be setting your internal DS clock to. You will be syncing your internal clock with Eontimer at certain points when RNGing. For this example you will be using 06:54:15. However, before entering in this time, check Eontimer’s “Minutes Before Target” that is right below the actual timer. For this example, our “Minutes Before Target” is 1, so you will need to set your time to one minute before the target. Set your time to 06:53:00 but DO NOT PRESS A YET!
- Now that you have both your DS clock at 06:53 and Eontimer open, you want to hit A on your DS, starting the clock, and the start button on Eontimer at the same time. It does not have to be perfect, but try to hit them both together.
- The timer will be counting down, giving you a little under a minute to set up your game for the next part. Shut off your DS and turn it back on. Wait on the game selection screen. When Eontimer hits 0, click the game title to start up the game.
- After Eontimer hits 0, a second timer will begin. This second timer is much quicker than the first and is measuring your delay. Here, you need to get to the screen which has your save file on it as quickly as possible. Once you reach it, wait until you see the second Eontimer hit 0. As this timer hits 0, select the option that lets you continue the game.
- Congratulations! You now know how to hit a delay!
Finding Your Calibrated Delay
If you’ve completed all of the steps of this guide so far, you should find yourself in-game, standing in front of a Legendary Pokémon. Intimidating it may be, but not near as intimidating as technical information needed to get this far. Use your newfound confidence and battle the Legendary, chucking Pokéballs, or, for easy mode, a Master Ball, at it until you catch it. Once caught, you can move on to the real work of finding your calibrated delay.
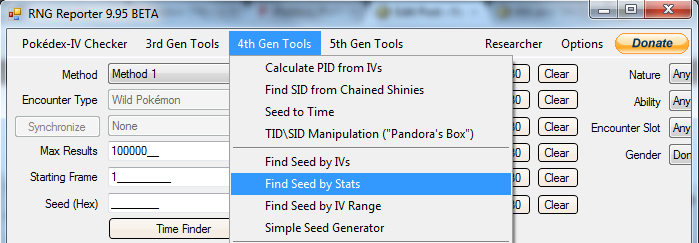
- Open RNG Reporter -> “4th Gen Tools” -> “Find Seed by Stats”. Enter in all the information it asks for, and click Find. The picture below is what you should have, and anything in the red box needs to be filled in. After you’ve filled in all of your stats, select Find to generate your calibrated second and delay.

- Write down the results you got for second and delay (if there is more than one result, pick the one closest to your starting second and delay). Repeat the steps in the “Hitting the Delay” section a few times to gain a few different data points. To find your calibrated delay, put the delay you hit most from your list into the “Delay Hit” box in Eontimer. Click Update. The number that pops up in the “Calibrated Delay” box is your new one.
- Congrats, you have now calibrated your 4th Generation Pokémon game!
5th Generation Calibration
Now that you know how to RNG in 4th Generation games, you will probably find both the calibration process and actual RNGing in 5th Generation to be much easier (well, except for that pesky Timer0). Unlike 4th Generation games, you cannot use a seed to calibrate yourself. Instead this calibration process will allow you to find seeds for your game. This guide will explain how to calibrate using a Nintendo DS Lite, so know that if you are using a different system there might be slight changes in the calibration process. If you have questions about your particular set up, feel free to ask in our RNG Help Thread. This guide only covers calibration for Standard Seeds.
Requirements
- Latest Version of RNG Reporter
- IV Calculator (RNG Reporter has one)
- Pokéballs
- Pokémon with Sweet Scent (optional; only needed if you are not using a Stationary Legend Pokémon for this)
DS Parameters
You’ve probably seen this phrase used a lot when talking about 5th Generation RNG. Just what is this needed for anyway? DS Parameters are required before you RNG in Pokemon Black and White because they allow you to search seeds. DS Parameters are dependent on your DS and cartridge, so calibration is required before you can RNG at all, and they are different for every person. The process you need to follow to find your DS Parameters is actually pretty simple, so I will list them in steps.
- Save in front of a stationary Pokémon or in the grass in the forest to the right of Nimbasa Town with a Pokémon that knows Sweet Scent. Shut your game off.

- Open up RNG Reporter -> “5th Gen Tools” -> “Find DS Parameters (Standard Seeds)”. First you will be filling out the boxes in “Seed Encryption Variables”.
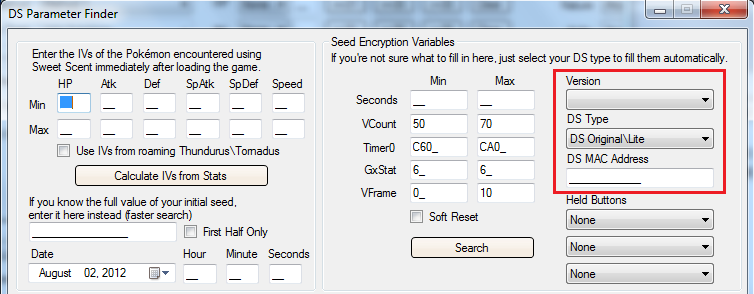
- Fill out your game version and DS type since those are self explanatory.
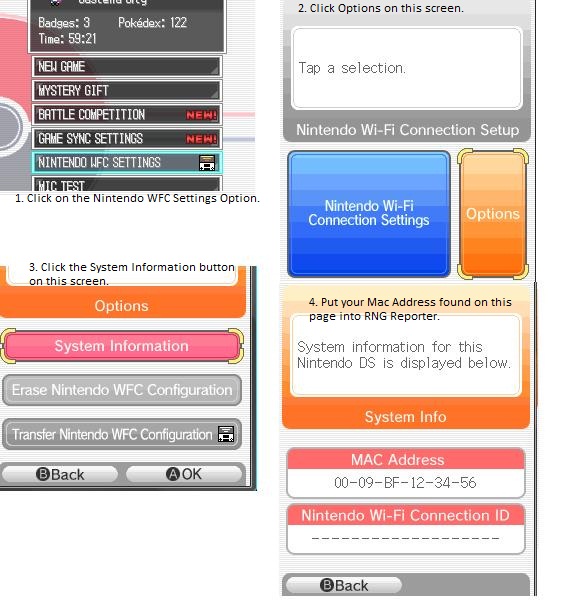
- Finding your MAC Address will be a little more difficult. To find your Mac Address, turn on your C-Gear. Of the three options click “Online”. Once you get to the next screen there should be little tools in the lower left corner, click that. The game will ask you some questions, say yes to all of them. It should make you save your game. After this, follow the steps in the following image:
- You will not be holding in any buttons, so leave the “Held Buttons” section alone. Now you will be moving to the left side of the DS Parameters box. Go into your DS’s setting to the Date section. Choose any random day and set it to that. Put this into the “Date” box.
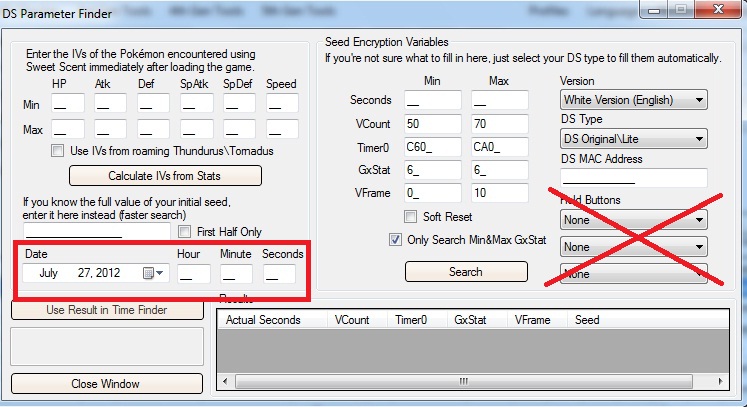
- Go into the Clock option on your DS. Choose any time you please and put the hour and minute into the DS Parameter window. Do NOT press A to set the time yet. You will need to decide on a second. I suggest using 20 as your target second because you will not have to wait long. Put whatever number you choose into the Seconds box.
- Now that you’ve decided on a second, press A to have your clock start at that time. Restart your DS and wait on game selection screen. You can see the clock ticking on the top screen, so use this to click the game title at the right time. If your target is 20, then wait until the seconds hand hits 19 and press A — always click when the seconds hand hits the second before your target. Make sure you do not press or hold in any buttons after you click the game title. You can press buttons once the Copyright page comes up.
- Continue until you arrive at the screen with the “Continue”, “New Game”, “Mystery Gift”, etc., options. Click the “Continue” option, but select “No” when asked to launch C-Gear communications. When it asks if it is OK to continue the game without the C-Gear on, click “Yes”.
- Now that you are in-game and standing in front of the stationary Pokémon or in the grass, proceed to talk to the stationary or use Sweet Scent. You should now be in a battle so just chuck Pokéballs until it is caught.
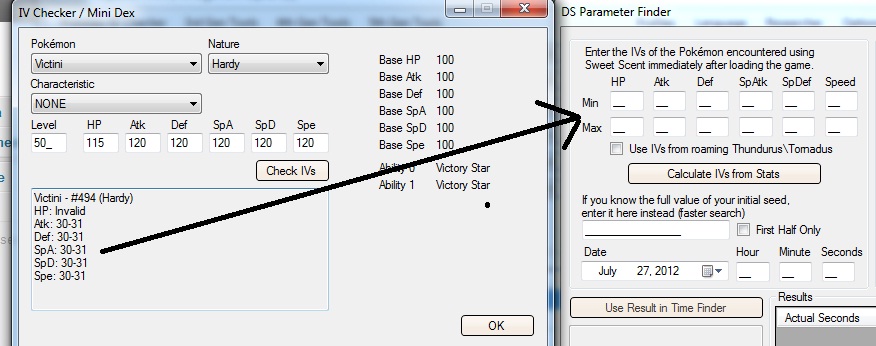
- Now that you have caught the Pokémon, go to RNG Reporter -> “Pokedex/IV Checker”. Fill this out and click Generate. This will give you an IV Range for the Pokémon you’ve caught. Now that you have an IV Range, go back into the DS Parameters box and enter the range for each stat. You do not have to save the game, so once you are done with this step you can shut off your DS.
- Click the Search button in the DS Parameters box. Write down the results and repeat steps 1-10 until you have consistently gotten the same result. This result is your DS’s Parameters, so you can now RNG in Pokémon Black and White!
What Can I Do With DS Parameters?
Now that you have your DS Parameters, you can search for seeds with RNG Reporter. The process to hit seeds is the same as what you did here, except RNG Reporter will give you a specific time to hit, and you will be doing more in-game to get the perfect Pokémon that you want. Check out the other guides in the Training section for how to search for seeds, as well as the methods you will be using to RNG your own competitive Pokémon. Good luck in your RNG endeavors!
About the Author
Cassie is known for being the Pokemon supplier for a lot of Nugget Bridge users, and has just recently proved she can battle as well by making Top Cut in 2012 Nationals. Although she lost to the eventual Champion, she placed 29th overall.
Related Posts
Breeding Perfect Pokémon in Omega Ruby and Alpha Sapphire →

Efficiently Capturing Your Roamer in Pokémon X and Y →

Mastering Kalos: Tips for the In-Game Trainer →