
4th Generation Breeding: An RNG Guide
Need to RNG something that has a HGSS/DPPt exclusive TM or egg move? You have come to the right place! This guide will explain Breeding RNG in both HGSS and DPPt, but you should know beforehand that unless you do not have a Heart Gold or Soul Silver cartridge you should not be breeding on DPPt. For one, most consider HGSS to be much easier because it only has one NPC advancing frames, while you have to calibrate your starting frame on DPPt each time. If “calibration” and “frames” are both foreign concepts to you, it would definitely be a smart idea to refer to the RNG Dictionary and familiarize yourself with what you find there.
While this article aims to cover the process to RNG an egg, it does not explain how to hit your delay. To learn how to do this, please view the 4th and 5th Gen Calibration article. When following along with this guide it is still important to note that all 4th Generation games switch between even and odd delays by either inserting a GBA game into the cartridge or changing the year you RNG in.
HGSS
Requirements
To be able to do RNG Breeding in HGSS there are a few requirements you have to meet before getting started. I will list those here and explain how all these things fit together to get you that flawless shiny egg you have been wanting so badly.
- Eontimer
- Latest Version of RNG Reporter
- Your Calibrated Delay/Time for HGSS
- Pokégear with Irwin’s number (Elm works too, but it requires you to have been in Kanto)
- Compatible parents to breed with in your party that you know the IVs of (if you want a completely flawless egg you must have 31 IVs in two different stats among the two parents)
- Your ID/SID (optional, required if you want shiny)
- Pokémon with Flame Body in party
- Something to check IVs with (a guy in the Battle Factory will tell you how good the IVs are or you can use the Hidden Power guy in Celadon City in Kanto)
Before you try to do RNG Breeding you need to be sure you have all of these things ready to go. In-game you must have at least gotten to Irwin (he is on Route 35 just north of Goldenrod City, where the Daycare Center is) and two compatible parent Pokémon. The actual RNGing of a Pokémon Egg works a lot like your calibration for 4th Generation games, except for HGSS you must hit two delays to get the Pokémon exactly how you want it. The first delay will determine the Nature/Ability/Gender/Shinyness (generally referred to as PID), and the second will determine IVs.
Getting the PID
1. Decide what you want to RNG. It is important to decide which Pokémon you put in first and second as the first is parent A and the second is parent B. Write down their IVs for later use.
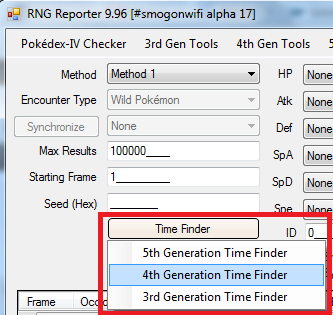
2. Open RNG Reporter, choose “Time Finder” -> “4th Generation Time Finder” -> “Shiny Egg”.
3. Change the option to HGSS and allow a pretty large range of delays that you are able to hit. (My calibrated delay is 535 so I go from around 540-800). If your Pokémon parents are of different nationality, tick the box that says “International Parents”.
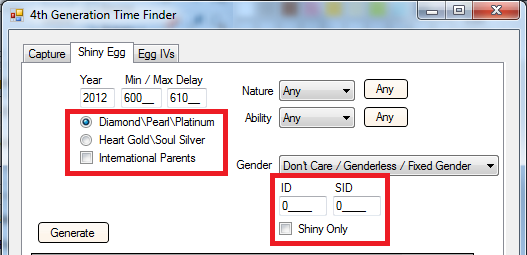
4. Enter your ID/SID combo, the Gender Ratio for the Pokémon you want to RNG, and what Nature/Ability you would like (if it matters). Press Generate. (Note: if you do not want a shiny Pokémon, enter any random ID/SID combo — if you do fill out the information in the red box).

5. Choose an odd-framed result, as they’re the easiest to hit. If the odd frame is higher than one, call Joey. He adds +2 to the PID frame, so 1 call = frame 3, 2 calls = frame 5 and so on.

6. Have the parents in your party and save in front of the Daycare Lady. In RNG Reporter, right-click the seed you are using and click “Generate more times…”. Enter the target second you want (usually 15 or 50, but really depends on how long you want to wait), change the option to HGSS and put in the current routes for your roamers if you have any (roamers tend to cause problems if they are still active; it is suggested that you kill them). Click “Generate” and then press it again once you choose one of the results.
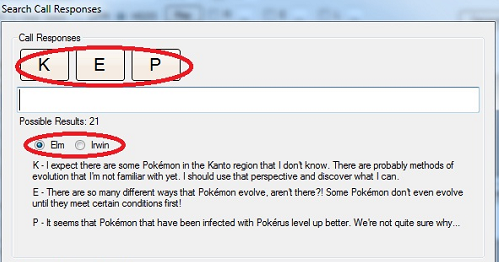
7. From here you just try to hit the seed and match the Elm calls (in “Seed to Time” there is a button called “Search Calls”, use this to figure out what call corresponds to what letter). If you hit your seed, and the wanted frame is just 1, you can give the parents to the Daycare Lady in the predetermined order you decided, and bike around until the Daycare Man is holding an egg. At that point, save in front of him WITHOUT taking the egg. If the wanted PID frame was 3 or greater, call Joey until you’ve reached it, then save in front of the Daycare Man without taking the egg.
8. So you saved. Now take the egg and hatch it to make sure you really hit your seed. If you did, congrats! Turn the game off without saving. Now on to Egg IVs.
Getting the IVs
1. If you are going for flawless you’ll need at least 3 different IVs in different among the two Pokémon to be flawless (that’s if you want hexflawless, less are needed if you do not want this).
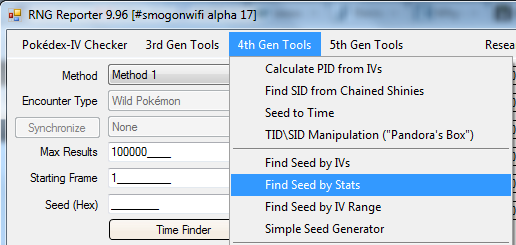
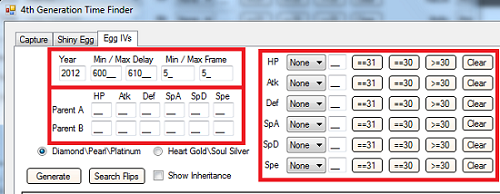
2. Open RNG reporter and click “Time Finder” -> “4th generation Time Finder” -> “Egg IVs.
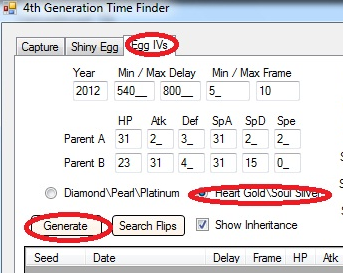
3. In the boxes next to “Parent A” and “Parent B” enter the IVs you found earlier. Since this is HGSS change it from the “Diamond\Pearl\Platinum” button to “HeartGold\SoulSilver”.
4. Tick the box that says “Show Inheritance” and in the boxes on the right side enter the IVs you want the egg to have.
5. Depending on your calibrated delay the “Minimum/Maximum Delays” will vary. My calibrated delay is around 535, so I usually search from 540-800. As for frame, 8-10 would be a safe choice as it leaves a margin for error that you can still fix (error being that the NPC advanced the frame by one or two).
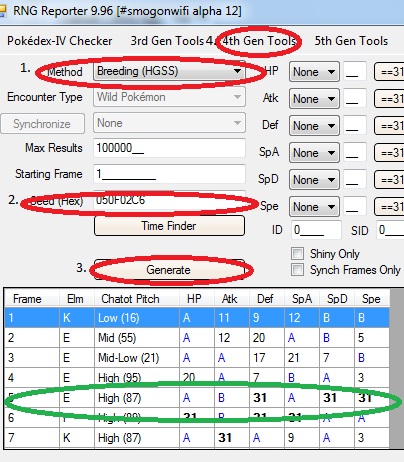
6. Click “Generate”. Determine which of the results you want to use, then right-click that seed and choose “Copy to Clipboard”. Return to the original page of RNG reporter (shown in the picture above) and look for the dropdown box that says “Method 1” and change it to “HGSS Breeding”. In the “Seed(Hex)” box, paste the seed. Click “Generate”.
7. In the toolbar at the top of RNG reporter, hover over “4th Gen Tools” and choose the option “Seed to Time”. Change the button that says “DPPt” to “HGSS”. If you have roamers out, be sure to tick the respective boxes and enter the route that they had been on prior to turning your DS off to RNG.
8. Press the first “Generate” button. Choose one of the results to use. Enter the corresponding information into their respective areas.
9. Assuming you were able to hit your delay, I’ll move on to advancing the frame. When hitting delays for Egg IVs in HGSS it’s a good idea to open the Pokégear as soon as possible to try to avoid having the NPC advance the frame. If you have roamers out, be sure to take that into account when trying to match the calls to the frames. If you are not getting any results then the NPC is probably messing with your frame, so without taking the egg, save in front of the Daycare Man again. If you have hit your delay then keep calling until you’re one call/frame before the desired IV spread. In the example in the picture the target frame is 5, so call 4 times.
10. When leaving the game menu be sure to talk to the Daycare Man to accept the egg as quickly as possible to keep the NPC from advancing the frame.
11. Hatch the egg and check the IVs. If the IVs are wrong, then check to see if they match another frame of the seed. If you are off because of the NPC, it is generally a good idea to shut the game off and then save again so that the NPC won’t advance it again (this is if it advances in between the time that you close the Pokégear and receive the egg). Follow the steps the same as before until you get the egg like you want it.
12. Enjoy your flawless Pokémon!
DPPt
But what if I don’t have Heart Gold or Soul Silver? What if I hate HGSS and HGSS hates me? Well breeding in DPPt is generally less advantageous due to losing access to HGSS exclusive egg moves. However, it can at times be just as good and, with enough practice, actually faster than HGSS breeding. But first you will need a few things:
Requirements
- RNG Reporter
- Eontimer
- Coin Flip app and Happiness app in your Pokétech
- A method to check IVs (a few rare candies work)
- Two breedable parents with as many desired IVs as possible
- ID/SID (if you want a shiny Pokémon)
Getting the PID
Much like in HGSS, the nature and ability of the Pokémon is generated with the egg and before the IVs. Therefore the first step is to RNG these traits into the egg the Daycare Man has for you. This method is performed in almost the exact same way in HGSS. However, what can make DPPt breeding easier is that there is an alternative method, but it is not at all easy if you want a shiny egg. First I will explain this method, so if you want a shiny egg, skip down to the Standard Method section. It might also be more difficult if you are using Diamond or Pearl.
DPPt Method
1. First and foremost, empty the Daycare. Once this difficult task has been completed, gather the following 5 Pokémon in your party: Parent A, Parent B, Pokémon with Fly, Pokémon with Flame Body (recommended), and a filler. Fly to the Resort area (highly recommended for Platinum) or another area with high level Pokémon.
2. Set your your Pokétech to the app before the Happiness app. Now save in a spot that you can immediately capture a Pokémon around level 50 and up upon entering your game. The Battle Zone has many good spots, but if you are using Platinum it is highly recommended to save by the pond in the Resort area and fish for Magikarp, as they are often very high leveled and very easy to capture.
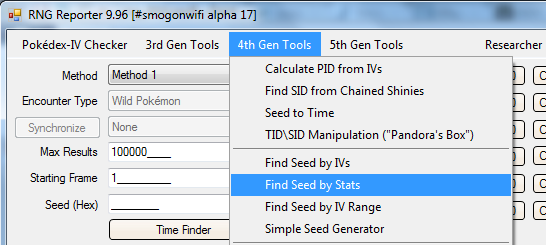
3. Next open RNG Reporter -> “4th Gen Tools” -> “Find Seed by Stats”. Enter in any date and time, your DS’s current date and time makes the most sense.
4. In your DS, set the date and time to one minute before the time in the “Seed by Stats” window. As soon as the DS clock hits this time, enter the game and quickly encounter a Pokémon. If it is level 47 or up capture it; if not, run and try a few more times.
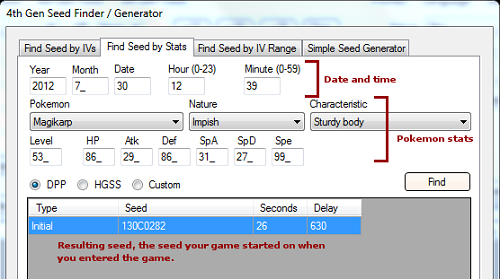
5. Once you have captured a high level Pokémon, type its stats, nature and characteristic into the RNG Reporter and press generate. If you get a singular result then you did it right, if not you might need a higher level Pokémon for more accurate results.
6. Once you get the singular result, press OK. On the main window of the RNG Reporter set the method to Gen 4 Egg PID, or Gen 4 Egg PID International if you are using international parents. Set the Nature and Ability to the ones you are aiming for and press “Generate”. Right-click on the first result and select “Calculate Pokétech Taps”.
7. Switch to the Happiness app and do the instructed taps followed by the instructed coin flips (each Happiness tap is one double tap that makes each Pokemon jump once). Then immediately fly to the Daycare and deposit the parents, making sure to remember the order in which they were deposited. Bike around until the Daycare Man has an egg, and save standing right in front of him. Hatch the egg to verify that you did it right, and then shut off the game without saving. If you did not get the right result, try again.
Standard Method
1. Begin by emptying your Daycare and having a party of 6 Pokémon consisting of the two parents, a Pokémon with Fly, and a Pokémon with Flame Body to hatch the eggs faster. With this team and the Coin Flip app open, save in front of the Daycare Lady’s desk.
2. Go to RNG Reporter->”4th Gen Time Finder”->”Shiny Egg” tab. Enter the desired Nature, Ability and Gender. Also enter a delay range that you would like to aim for. Anything from 600 to 1000 works but you will get so many results that I recommend a range no wider than 100. I usually do 800-900. Check “International Parents” if you are using parents of different nationalities.
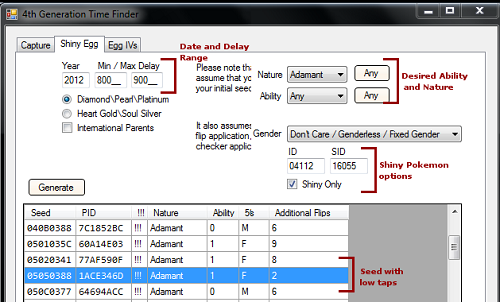
3. If you want a shiny Pokémon, enter your Trainer ID and Secret ID into the appropriate boxes and check the “Shiny Only” box.
4. After entering all your information, press “Generate” and wait as seeds are generated. Find a seed with good Happiness taps and coin flips, the lower the easier. Right-click on it and select generate more times.
5. Choose a time (I prefer one within the same month), and press the “Generate” button in the middle of the window. Now you must hit your desired time and delay and verify by flipping the coin in the coin flip app and entering the results into the Search Flips window; how to hit desired times and delays can be found in the Calibration article.
6. Once you have hit your delay AND verified it with 10 coin flips, exit the “More Times” window and do the number of coin flips and Happiness taps asked for in the last two columns. One Happiness tap is equal to one double tap on the background, resulting in every Pokémon jumping once.
7. After you have done the taps and flips, put both parents in the Daycare, making sure to remember which parent you put in first and which was placed second.
8. Now, simply bike around until the Daycare Man has an egg ready for you. Save in front of him and hatch the egg to verify that you got the right nature, ability, etc. If you did not, start all over again!
Getting the IVs – Frame Calibration
Now that we have an egg with the proper PID, it’s time to start working on its IVs. However, unlike HGSS there are multiple NPCs around the Daycare, so first we must find which frame our save places us at.
1. Open RNG Reporter -> “4th Gen Tools” -> “Find Seed by Stats”. Depending on which method you used to get the PID, you may already know how to use this.
2. Enter a date and time 2 days or more away from your DS’s current date into the Seed by Stats window and then set your DS to that date and time, minus one minute. As soon as the DS clock hits the time you put in the window, enter the game, press B when the journal pops up, and mash A as fast as you can to get the egg.
3. Now you must find and capture a high level Pokémon, around level 47 or up. Once again, there are high level Pokémon in the Battle Zone, and if you are using Platinum use the pond in the Resort Area. Enter the Pokémon, stats, nature, and characteristics into the “Seed by Stats” window and press find. You should get one result, if you get more or none you probably need a higher level Pokémon to get more accurate results.
4. When you get your results press “OK” and the seed should show up in main window of RNG Reporter. Set the method to “DPPt Breeding” and press “Generate”. Make sure the starting frame is 1 and the Nature, Ability, encounter slot, and Gender options are set to “any”.
5. Now you simply hatch your egg and try to find out what IVs the result has. I like to use MetalKid’s IV Calculator, which can let you use multiple levels to figure out the IVs; however, any IV calculator will work. You do not need to get exact IVs but simply narrow them down. Try to match the IVs to one of the first 15 IV spreads given to you by the RNG Reporter. Once you discover which frame this egg was at, repeat the frame calibration a few more times, recording the frame each time.
Time to Actually Get This Thing
Alright, now that we have a good nature egg sitting in the Daycare and we know what frames we will likely land on, it’s time to finish up here!
1. Open the “4th Gen Time Finder” window again, but this time go to the “Egg IVs” tab. Enter in the year and what delay range you will be aiming for. Then enter in what IVs you want the egg to have, as well as IVs of the first parent you put in the Daycare in the row labeled Parent A and the IVs of the second in the one labeled Parent B. You do not have to have every IV, only the ones that you also want the offspring to have matter.
2. Set both the Min and Max frame to the frame you got most often during the calibration stage. You can also get more results if you find a frame that is higher by a multiple of 2 (if you have 3 then 5, 7, 9 etc.), but I often do not find it necessary.
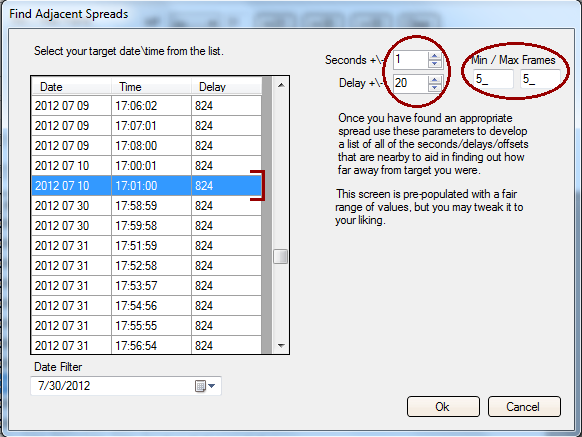
3. Generate the results and pick whichever seed looks good, it really doesn’t matter much. Right-click this seed and click the “Generate Adjacent Results” option, which should pop up another window. For hitting delay purposes I recommend that you set the Min and Max frame to the frame you are aiming for to avoid confusion when checking coin flips. First time RNGers should also set the +/- delay to 20 or 30 until they are a bit better at hitting delays. Next choose a time from the list and press “OK”. You will now have a list of adjacent seeds as well as the one you are aiming for.
4. Now you must hit your desired time and delay. Information on how to hit desired times and delays can be found in the Calibration article. If you picked a seed on a frame higher than the one you got from the calibration stage, you must stop at the journal each time and advance the frame by flipping to a page with a caught or defeated a wild Pokémon message. Each flip to that page increases the frame by 2 (if the journal opens to a page like this, it DOES NOT count as two as it was already factored into your first frame). After all necessary advances are complete, press “Start” to exit the journal and mash the A button to grab the egg as fast as possible. Then check what delay you hit by flipping the coin flip app 10 times and entering the results into the “Search Flips” option.
5. Once you hit your delay, simply hatch the egg and see if it has the desired IVs — you can use the man in the Battle Tower to help tell you about the Pokémon’s IVs. If you did not get the correct IVs, narrow down the IVs again and find out which frame you did hit. Copy and paste the seed you hit into the main window to see the list of adjacent frames. If you hit the same wrong frame often, try using this frame instead as your initial frame.
6. If you did it right, enjoy your flawless Pokémon!
About the Author
Cassie is known for being the Pokemon supplier for a lot of Nugget Bridge users, and has just recently proved she can battle as well by making Top Cut in 2012 Nationals. Although she lost to the eventual Champion, she placed 29th overall.
Related Posts

Breeding Perfect Pokémon in Omega Ruby and Alpha Sapphire →

Efficiently Capturing Your Roamer in Pokémon X and Y →

Mastering Kalos: Tips for the In-Game Trainer →